Requirements and Backing Up Data
1.Google Sync is only supported on Apple iOS versions 3.0 and above. You can check your current version by going to Settings > General > About > Version. If you're running an iOS before 3.0, upgrade to the latest iOS on Apple's site: http://www.apple.com/ios/ before setting up Google Sync.2. Perform a sync with iTunes to ensure that Contacts and Calendars from your iOS device are backed up to your computer. Learn more about backing up your Contacts and Calendars.
3. If your business, school, or organization uses Google Apps, your administrator will first need to enable Google Sync before you can take advantage of this feature. Note that if you enable Google Sync, your administrator may also have additional remote management capabilities (such as remote wipe or password requirements). Click to learn more or contact your administrator.
Getting Started
1. Open the Settings application on your device's home screen.2. Open Mail, Contacts, Calendars.
3. Press Add Account....
4. Select Microsoft Exchange. iOS 4.0+ allows multiple Exchange accounts. However, if you're on a device that doesn't let you add a second account, you could also use CalDAV to sync Google Calendar and IMAP to sync Gmail.

Enter Account Info
5. In the Email field, enter your full Google Account email address. If you use an @googlemail.com address, you may see an "Unable to verify certificate" warning when you proceed to the next step.6. Leave the Domain field blank.
7. Enter your full Google Account email address as the Username.
8. Enter your Google Account password as the Password. (If you are a 2-step verification user, please use an application-specific password instead.)
9. Tap Next at the top of your screen.
9a. Choose Cancel if the Unable to Verify Certificate dialog appears.
10. When the new Server field appears, enter m.google.com.
11. Press Next at the top of your screen again.
Set up "Send Mail As" feature
Enable "Send Mail As" feature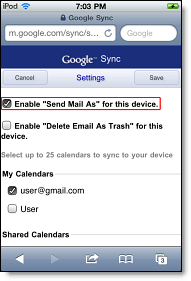
Enable Mail and Calendar
12. Select the Google services (Mail, Calendar, and Contacts) you want to sync. To receive and respond to meeting requests on your device, both Mail and Calendar need to be turned on, and New Invitations needs to be enabled in your Google Calendar settings.To enable New Invitations, sign in to your Google Calendar using the web browser on your phone or computer. Go to Calendar Settings > Calendars > Click on the Notifications for the calendar you want to sync. Under Email check New Invitations (and any of the other Invitation settings you want enabled), and click Save.
13. Unless you want to delete all the existing Contacts and Calendars on your phone, select the Keep on my iPhone (or iPad or iPod touch) option when prompted. This will also allow you to keep syncing with your computer via iTunes.
If you want to sync only the My Contacts group, you must choose to Delete Existing Contacts during the Google Sync install when prompted. If you choose to keep existing contacts, it will sync the contents of the All Contacts group instead. If there are no contacts on your phone, the latter will happen -- the contents of your All Contacts group will be synced.
You've set up Google Sync! Synchronization will begin automatically if you have Push enabled on your device. You can also open the Mail, Calendar, or Contacts app and wait a few seconds to start a sync.
Comments